Banjo Construction, Setup and Physics
Last updated 24 November 2012
Introduction
The first chapters are related to the physics of the banjo (and string instruments in general). The later chapters are really an accumulation of notes on various aspects of construction and setting up the banjo. Unlike the guitar, you can change and experiment with different parts of the banjo and thus alter its sound quite considerably: change bridges, the head, tailpiece. You can even exchange necks and pots to create an entirely new instrument. This all requires some knowledge and experience. These notes have helped me along the way. The later chapters on lutherie and setups have been borrowed from various forums, articles and videos on the web.
There are 2 more pages covering different aspects of the 5 string banjo:
- Celtic music for the 5 string banjo
- The Five String Banjo - general topics
String Tension
You would think that using heavier gauge strings puts more strain on the neck - but that is not a given, it's all relative...
Given the following 4 variables:
- T = tension in pound force (lbf )
- UW = Unit weight in pounds per linear inch
- L = Vibrating length of the string in inches
- F = Frequency in Hz
Then the relationship between these variables is : T = (UW*(2*L*F)2)/386.4
UPDATE: I derived this equation on a separate page, see Calculating String Tension. The value of 386.4 used here is slightly different from my calculated value of 386.088 probably because it takes other factors such as stiffness into account.
The Unit Weight (UW) can be derived from the manufacturer's datasheets. I used the values given in D'Addario's datasheet. I derived the respective frequencies (F) from Seventh String. With all this information I constructed following tables:
Standard G tuning
| Pitch | Gauge | UW | L | F | T |
| D4 | .010 | 0.00002215 | 26 1/4 | 293.7 | 13.6290 |
| B3 | .012 | 0.00003190 | 26 1/4 | 246.9 | 13.8712 |
| G3 | .016 | 0.00005671 | 26 1/4 | 196.0 | 15.5400 |
| D3 | .023w | 0.00009739 | 26 1/4 | 146.8 | 14.9709 |
| G4 | .010 | 0.00002215 | 19 5/8 | 392.0 | 13.5702 |
| Total: | 71.5813 lbf = 32.4687 kgF |
G tuning tuned Fourth down to D
| Pitch | Gauge | UW | L | F | T |
| A3 | .012 | 0.00003190 | 26 1/4 | 220.0 | 11.0133 |
| F#3 | .014 | 0.00004342 | 26 1/4 | 185.0 | 10.6002 |
| D3 | .020w | 0.00007282 | 26 1/4 | 146.8 | 11.1940 |
| A2 | .024w | 0.00010857 | 26 1/4 | 110.0 | 09.3708 |
| D4 | .012 | 0.00003190 | 19 5/8 | 293.7 | 10.9709 |
| Total: | 53.1492 lbf = 24.1081 kgF |
The results show that quite the reverse is true, though the strings are heavier, they don't need to be tightened as much. It probably is a case for slightly increasing the gauges for the lower tuned (D) banjo strings - until the total tension roughly equals that of the normal (G) tuned banjo. This will probably improve the sound while maintaining the instrument's mechanical integrity, the only downside being that it will be a little more difficult to play.
Banjo Fretboard Scales
After making some enquiries regarding a low-tuned banjo on the Banjo Hangout forum, see my post and replies on should low tuned banjos use 24 frets?, I was inspired by the diagrams posted by Uncle Fogey on that thread to create a CAD drawing with accurate dimensions and scales. To this end I did a little more research and deviced some equations for spacing the frets on the fretboards, see Scaling the Fretboard. The equations I found on the net were either pre-calculated or approximated. The Fretboard page also has a spreadsheet you can use to calculate fret spacings for any Scale (distance between nut and bridge).
Some interesting facts arose from this thread which I can summarize as follows:
- The standard banjo has an 11' Head (pot)
- There are 2 main scales, The Gibson and the Vegas
- The standard 22 fret Gibson has a 26.25" scale and a 19.9" fingerboard
- The standard 22 fret Vegas has a 26.9" scale and a 19.65" fingerboard
- There are 2 types of 24 fret banjos
- First type
- the 2 extra frets are placed at the bridge-end
- bridge moves the distance of 2 frets to the center
- the scale remains the same
- e.g. the John Hartford 24 fret Deering banjo
- last 2 frets are smaller than the smallest one on a 22 fret banjo
- Second type
- the 2 extra frets are placed at the tuning pegs - end
- bridge remains at the sweet spot
- the scale increases
- E.g. the John A'Angelica model uses Vega Tubaphone and 30.35" scale
- last 2 frets are larger or equal to the smallest one on a 22 fret standard banjo
- The drawing shows the 5th string tuning peg at the 5th fret. In the real world it is located at the 7th fret. This of course would make finger picking up the neck dificult.
- First type
The following diagrams (images from my CAD drawings) illustrate the 2 types of banjos. The first image shows a standard 22 fret Gibson with a 26.25" scale, the second a First type 24 fret Gibson banjo also with a 26.25" scale. The third image shows a standard 22 fret Vegas with a 26.9" scale and the last one a Second Type 24 Fret Vegas banjo with a 30.35" scale.
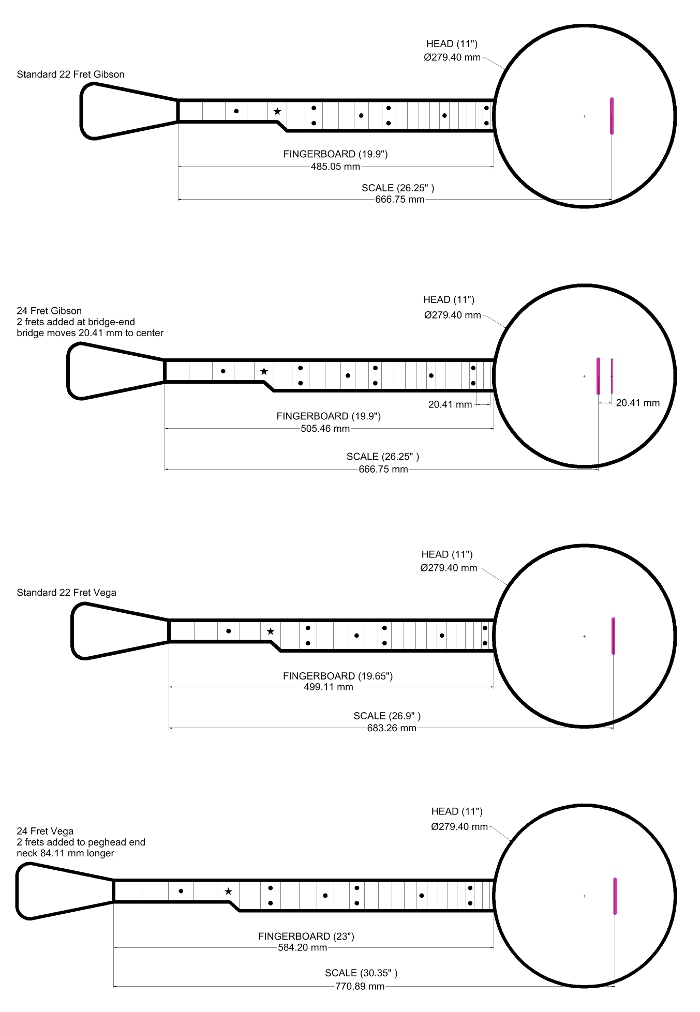
After consideration, I believe that the Second Type 24 fret banjo would make the best sound for a low tuned banjo, but I am worried about the extra length, it is quite significant. The First Type 24 fret banjo has very small frets at the end which will be difficult to play, especially since the strings will be heavier gauged.
Notes on Setting Up
Relief
- Relief refers to the amount of forward curvature to the neck.
- Put a straight edge on top of the frets, there there should be about 0.4 mm clearance between the straight edge and the top of the 7th fret.
- The correct action is a gap of 1.6 mm to 2.4 mm between the bottom of the strings 4 through 1 and the top of the 12th fret. The 5th string will be a little lower.
- Different methods:
- Hold down 1st and 12th frets. Gap between string and 5th fret on the fourth string should be about 0.4 mm (0.015").
- Slide your capo up one fret, push down on the first string at the 22nd fret, measure the gap at the 7th fret.
- Fret the first fret and check the clearance over the 2nd fret. Then do the same, fretting at the 21st and see the much higher clearance at the 22nd. The closer to the nut then the less angle of the string leaving the fret to the next fret. Relief helps to increase the string angle and eliminate buzzing on the lower frets..
- 0.6 mm is high relief, 0.25 mm is low relief
- A backbowed neck will buzz between the nut and the fifth fret.
- Buzzing from the 7th fret onwards indicates too much relief
- Some necks are uneven and have different levels of relief in different areas. Check over portions of the neck the same way as checking relief over the whole neck.
- Take into account that heavier strings need less clearance to vibrate.
- Generally, when talking about relief, it is assumed that the first fret is capoed and the 22nd fret is held down.
There's a great technical discussion on neck relief on Bryan Kimsey's website. Interestingly, he concludes that the common rules 'Bluegrass players need neck relief' and 'You need neck relief to bend strings' are a myth ... Feelwise, I'm a big fan of flatter necks... The lower mid-range action of a flatter neck makes a huge difference to playing comfort for me, and even when the 12th fret action is higher, the action gets consistently higher. This is not true of a neck with greater relief - with those, the action gets stiffer in the mid-neck and then softer as you hit the higher frets.
My procedure in resetting the frets and adjusting the relief runs as follows:
After removing the strings
I ensure that the neck is flat and mark all the frets with a black felt pen. I then
stick some sandpaper on an old plane (without its blade) and sand down the frets lightly
until all black marks have just disappeared. Then I use a crowning file to round the tops
of the frets and polish them nice and smooth with grade 0000 steel wool using fret guards to
avoid damage to the fretboard.
For the particular banjo I have, I ensure that the neck has a slight bow in the middle so that the clearance between
the first fret and a straightedge positions on top of the frets is 0.127mm, and the clearance between the 22nd fret and
a straightedge is 0.33 mm. After tightening the strings, the tension of my medium gauge
strings (10, 11, 16, 23, 10) will cause the neck to bow the other way so that a clearance of
0.152 mm appears between fret 7 (its lowest point) and the straightedge. These measurements of course
will depend on the type of wood and tensioning rod of your particular banjo.
Head tension
- Tony Trishka tunes his skin to A. See him demonstrating this
on this
youtube video around 2:40.
Small changes can have drastic effects, mine went from about Eb to A by turning each bracket about 1/3rd turn. A day later it settled on the F pitch where it has stayed since (for about 2 weeks now). - Another video demonstrates Head tuning including tap sounds.
Adjust Trust rod
- Loose trust rod gives bow (relief)
- Loosen coordinator rod until just tight
- Adjust rod to achieve the required gap measurements given in the 'Relief' heading above
- Low parts of the vibration are around the 5th fret and equal distance from the bridge - this is where the string vibrates most
Adjust coordinator rod
Loosen nuts. Move outer nut 1/3 turn inwards and tighten up again.
Adjust nut
Some people just file down the slots on the nut until the strings are at the height they would be if the slot had been a fret.
The standard method is to hold down the 3rd fret and measure the clearance between the string and the 1st fret which should be 0.001" for the small diameter strings to about 0.004" for the large diameter string.
The slots in the nut should be round at the bottom, matching the string diameter and angled downward and to the side to form a perfect path to the tuning post.
My preferred way of adjusting the nut (after many mishaps whereby a single stroke with the mini saw rendered the nut useless) is to put the capo on the 3rd fret and look for a small clearing between the string and the top of the 1st fret. You should be able to tap the string slightly making it hit the top of the first fret. I do this for each string individually: slacken the string first and lift it out of its slot - cut into the slot just one or 2 strokes at a time - then lift the string back into its slot, tighten it and inspect the clearance. Do this repeatedly until you're happy with it. I give the heavier strings a little more clearance than the light ones.
Adjust bridge
- Mark bridge position
- Attach 1st and 4th string
- Check tuning at octaves for each string
- Mark correct position lining tape against the edge
Adjust Tailpiece
tailpiece allows pressure to the bridge. Adjustable to 13-15 degrees - 'break angle'
Notes on Lutherie
Finishes
- Wax is a great final step for Danish Oil.
- Finish smooth with 0000 steel wool or synthetic wool and then wax.. Cherry is a closed grain wood, so it will wax very well.
- Birchwood Casey Tru-oil is perfect for banjo and can be repaired if needed.
- Apply Tru-Oil, 3 to 5 coats coats. Tru oil will get a higher gloss than danish. The surface prep must be perfect and up to at least 1500 grit. You can wipe it on with a plain old coffee filter. Just cut it back after each coat with 0000 steel wool and polish the last coat with a dry coffee filter.
Fretboard
- See Setting
up fretboard.
Tools required:- 5 oz plastic covered hammer
- fret guard
- fret file
- crowning files - rounds top of fret - 150 and 300 grid
- straight edges spanning 3 frets
- 0000 steel wool
- Sand around fret masked with guard (Al plate with slot) with 320 grid sandpaper wrapped around rubber eraser, then polish with 0000 steel wool, then polish with buffing compound (using dremel)
Tonerings
Traditionally made from brass (bell-brass), because needed to be in contact with a wetted calfskin.
Archtop has 2 ridges, one at 9.5", one at 11", gives higher pitch
Head
- Mylar or Skin (Calf skin)
- distance of side is 1/2" for high collar
- Head initially is clear, the frosty front is sprayed on lacquer
- The less material on the head, the brighter the sound
Head Assembly
- Push down new skin with 4 opposing hooks without the tension ring to 'center the head' to compensate for wobbly tonering
- untighten 4 hooks, place tension ring and tighten 4 opposing hooks ensure head is tensioned equally down
- slightly tighten up the 4 strings so the tension ring fits snugly in place bring up all other hooks and snug-up - don't tighten yet.
- Mark dead center on the coordinator rod or dowel. Hold ruler accross so that you know which are the opposing hooks Go around and use quarter turns at a time
- check edge around tension ring is equal distance to the top
- Tighten so that it is hard to press down on it. With torque wrench, tighten each nut up to 10 kg/cm. Torque depends on thread pitch, fine thread needs more force. Main aim is to get equal amount of pressure.
I prefer to fine-tune the head by pitch - see Notes on setting up
Bits 'n' pieces
Fingerpick adjustment
Color the fingerpick blades with a felt tip pen and observe how the color wears off after some playing. Adjust the picks so there is still color near the edges but none in the middle of the picks.
Fingerpick noise
Occurs when picking an already vibrating string. Pick with the tips of the picks, don't dig into the strings. The attack should be short.
Disassembling
Before disassembling, tighten the screws in the pot, because they already are lined up loosen nuts but leave them on the attachments
Gluing hint
If you put a little water in the cracks before gluing, it will help the glue to get far down into the crack.
Dulling the 5th string tone
You can put a piece of paper or electrical tape under your 5th at the bridge to dull it out.
Microphones
- Shure Beta 98D mic with a A98D Drum mount
- PCMM10B - with limiter - AUD450
- ICDSX713S - AUD349
- ICDUX512FB - AUD179
Links and references
Banjo Setup and Lutherie
- Banjo Construction Tips - See also the other pages on this site
- Building a 5 String Banjo
- Musical Instrument Makers forum
- Wood Strength Table
- Stewart Mc Donald Trade Secrets
- liutaio mottola - instrument plans, etc
- Savart Journal - Science and Technology of stringed musical instruments
- Guild of American Luthiers
- Luth.org - instrument plans
- Banjo construction photos
- Finishing oils - great discussion on Banjo Hangout on Finishing Oils
- Woodgrain identification
- Tasmanian Tonewood
- info on specific types of wood
- Demonstrating difference in tone rings
- Banjo Setup - Banjo train website, many articles for setting up a banjo.
- Fret Dressing and setup for classical guitar
- Re-fretting http://www.frets.com/fretspages/Musician/GenSetup/NutAction/nutaction.html"> Nut action
- Setting up the 5 string banjo - a selection from a two hour long DVD on setting up and maintaining the 5-string banjo. It describes the need for neck relief and explains how the truss rod adjustment affects the neck.
- Magnets for resonators
- Good info on finishing
- Wooden Armrests
- info on installing bindings
- Good source for buying single strings in bulk
Banjo Kits
- Rickard banjos store - beautiful kits and individual parts, mainly for old-time
- Rickard Banjo kit construction notes
- Rickard banjos Blog page
- Goldtone OB250 kit